Ben's Workbench
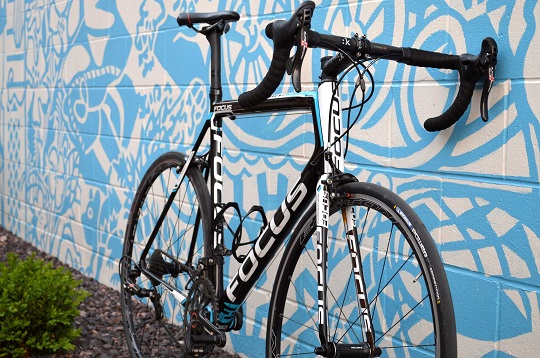
FeldBike-Focus Izalco Max AG2R Team Edition
May 12, 2017
Hey all! This week we’re going to hear from a newer member of our team, Eric (Feldbike). Eric puts on hundreds of miles each week and knows his bikes. In his debut, he will be telling you about his newest two-wheeled acquisition and a new brand we’ve started carrying. Enjoy.
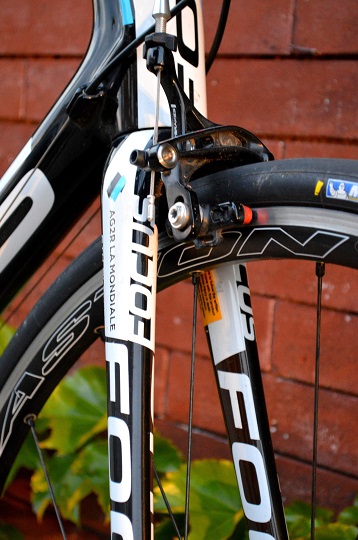
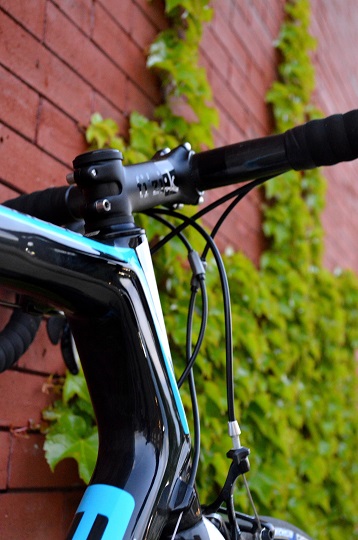
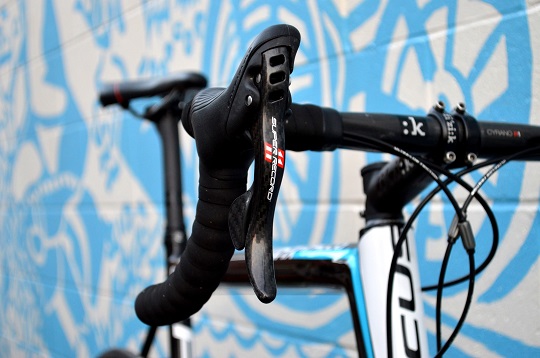
“It’s not about the bike…” Yeahhhh right, you only say that if you haven’t ridden an Izalco Max. Responsive. Light. Stiff. Beautiful. An engineering masterpiece. These are all things that are present in an in-depth long term review of Focus’ Izalco Max. In a world of bikes becoming super “aero” with all these crazy swooping top tubes, “space aged” tube shapes, hourglass figured seat stays, and obnoxious geometry, Focus still holds true to a classic bike geometry which I find…. incredibly beautiful. The oversized downtube and top-tube, massive headtube, pencil thin seat stays, and rock solid bottom bracket all make this bike a machine. When you set yourself upon the saddle you can feel your legs revving up to thrust this rocket forward.

When unpacking and building this rig there was only one thing going through my mind. How can you even ride this bike…? With the stock wheels (Fulcrum Racing Speed 35 Tubulars) the bike weighed in at an obese 13 lbs. 12 oz. I know. That’s stupid light. With my Easton EA90 SL training wheelset (pictured in the photos) the bike was overloaded to a weight of 14 lbs. 10 oz. Once again. This bike is stupid light! I could go through the whole bicycle and comment on how light every component is, but it’s a sub 15 pound bike with alloy clinchers on it (I don’t use latex tubes either, I buy into other gimmicks). But how does this featherweight feel out on the road?
With the first three pedal strokes I had a massive smile from helmet strap to helmet strap that didn’t go away for a week and a half probably. The bike takes off. I don’t just call any carbon bike a rocket, but the Izalco Max is precisely that. It’s a beautiful how they’ve engineered a bike that weighs so little, to have the stiffness of a block of steel, but the comfort of a lazy boy. I initially thought that the bike would have a harsh ride and call out every single crack, bump, and uneven surface. Boy was I wrong. The ride is incredibly mellow. Comfort was a goal from the start of the design process, I wasn’t there for that obviously, but it is apparent. The pencil thin seat stays give you the flex for the smoothest of smooth rides. Combined with the 6th Element fork (which has to be the thinnest fork I’ve ever seen) the ride cannot be compared. After a few weeks of riding the Izalco Max, my previous main steed (2014 Ridley Noah) just doesn’t compare in many places. Vertical compliance is definitely one of those. A bike with this much stiffness doesn’t seem like it should offer such comfort from bumps, it’s incredible.
One of the things that left me in awe is how this rocket loves to fly up inclines. I find myself tackling 15 percent inclines in ratios like 53x19 and 53x21. Because I flippin’ can. There is NOTHING lost even when you’re grinding up these walls at 60 RPM. I’m not here to endorse grinding, and firmly believe in spinning, but I sometimes forget I’m in such a low gear because the bike is still flying forward. All the power, all the watts, straight to your rear wheel. Not a watt wasted, seriously why would you want to do that EVER.
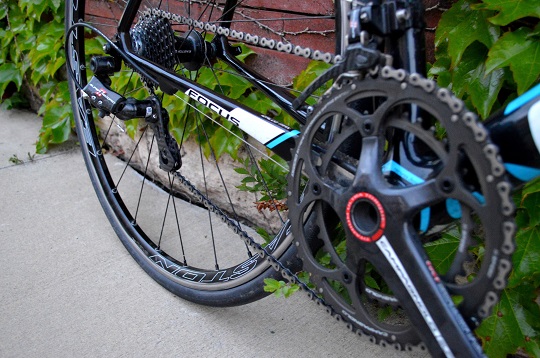
So the bike I have enjoyed riding is the Izalco Max that the AG2R team rode in 2014. I have never owned a bike that came stock spec’d with so much bling. And I mean bling. I’ve never thought of riding Fizik bars (especially carbon Fizik bars), Fizik stem/seat post combos. They’re pricy. If the saddle agreed with me I’d even have a carbon Fizik Arione on there, but my days on a 2x4 saddle are over. But it gets better. I’m talking a full Camagnolo Super Record 11 speed groupset. DOWN TO THE CASSETTE!! That is a $400 cassette!!! WHAT!?!?!? Alright, they skimped on the chain, it was only a Record chain… But I will need a new one by August, so I can fix that. So this is the all out, climb Mt. Ventoux race bike, but I’m mentioning all this for a reason: All the models that are the more recreational, or endurance oriented benefit from this as well. The Izalco Ergo and Izalco Donna models are spec’d with full Ultegra 11 speed groupsets DOWN TO THE CASSETTE! This hasn’t been common up until recent years in the bike industry, but Focus has been doing it since 2014 at least. That’s awesome. The first places bikes normally get skimped on component wise are all spec’d with top of the line stuff.
Following pro cycling, I’ve seen greats like Romain Bardet use the same bike that I now own fly up mountains in grand tours. Jeremy Powers smashes CycloCross races on Focus Mares CX bikes. I always assumed that Focus was another variety of high end bicycle, with the same claims that I would take 27 seconds off my 40k time trial, or that I would climb Mt. Ventoux 5 minutes faster. But they’re not. They just make super rad bikes. Ride quality and value, they are hard to beat. At all levels, I’ve been impressed. As I have been saying to my friends, “Do yourself a favor, and join team Focus.”
-Feldbike
Bicycle Changes: Disc Brakes
04/24/2017
Last month we started the discussion of newer technologies that are taking over the bike industry and may be causing some confusion with those who actually support the industry. We’ve looked at tubeless tires below. Now we’ll take a look at disc brakes: the pros the cons and why they are becoming more contested and prevalent in bicycles and their various disciplines.
Now when I saw “contested” what I mean is that in road racing there has been a hoop-la about disc brakes in the last couple years. The governing body of road racing, the UCI, did not allow them in sanctioned events until 2016. In the Paris-Roubaix in April of ‘16 Francisco Ventoso wrecked and cut his leg, supposedly on the disc brake rotor. After the accident, the UCI re-banned the brakes pending further investigation. In October of ’16 the UCI announced that it would again allow disc brakes to be used in races starting Jan. 2017 on a trial basis. Like I said, hoop-la. But why are they looking at disc brakes when most of the pro field doesn’t think they are necessary? Performance.
Rim-based brakes of all kinds have ruled the bike industry for years and have worked well. They come in many different forms but always consist of rubber pads on aluminum, steel, or carbon barking surfaces. As well as rim brakes have worked however, they do have some short comings. Since the rim is a major part of the braking formula, performance is easily compromised by whatever you may be riding through. For instance: if you get caught in the rain the rim will be wet. The water on the rim reduces the friction needed to slow you down, therefore increasing the distance needed to stop which isn’t so good if you need to make an emergency stop on your daily commute. Snow, mud, rain, random puddles in the street, and excess dust can all affect your braking performance not to mention how quickly rubber pads can wear out. So how are disc brakes better?
Disc brakes consist of a metal rotor mounted to the hub of your bike wheels and a caliper with two pads that press against the rotor when you squeeze the brake lever. They are, far and away, the most consistent braking product out there right now. They are not without flaw and we’ll get to that in a moment. But back to the “pros”. Whereas rim brakes are dependent on rim conditions, disc brakes are dependent on rotor conditions. Luckily the brake rotor doesn’t run through the same road muck the rim does and because of the tight tolerances between the rotor and pads, the system sheds any mud, dirt, or snow that may want to collect in the caliper. So in the design of the system the rotor/caliper combo is self-cleaning and therefore less affected by these potential contaminates than a rim brake. When it comes to rain, the compounds of the disc brake pads aren’t affected the way a rubber pad is on the rim. Disc brake pads also tend to last a lot longer than rim brake pads. Now, like I said, disc brakes aren’t without flaws. So let’s look at some of them.
If you’re new to disc brakes or considering switching, there are couple things you should be aware of. The first thing most people notice on their foray into disc brakes are the noises that weren’t there with their rim-brake bikes. Even with a properly adjusted system it’s normal to get some metallic swishing sounds while riding, especially under times of exertion because of the flex in the bike’s frame and wheels. This also happens on rim-brake bikes, but the sound isn’t as noticeable. So, if this is happening to you, congrats you’re normal. If, however, you’re getting a honking sound while braking you may have another issue going on.
For some reason people really like to touch their brakes rotors. A lot. Please don’t. The biggest short coming of disc brakes is contamination. Contamination is when an oil of various kinds gets onto the rotor and then is transferred to the pads. If this happens to your bike then you will be able to communicate with the geese down around Cedar Lake. On the bright side perhaps you can tell the geese that your friendly and they shouldn’t charge… good luck with that. On the other hand, you’ll irritate everyone around you. But you can prevent this howling with two simple tips: don’t touch your brake rotors or pads with your bare hands and when lubing your chain (see bottom post for chain lubing questions) use a drip lube instead of aerosol. Doing these two things will prevent about 90% of brakes infected with howler monkeys. If your brakes do become infected there is typically a simple fix: replacement of the pads and sometimes the rotors.
Honestly, I’ll accept the little extra noise on my bike to get far better braking performance. I’d rather stop when a car cuts me off than be quite the rest of the time. For now though the choice is largely up to you. If you’d like to talk more specifics, let me know. We’re here to help.
Ben
Bicycle Changes: Tubeless TIres
03/28/2017
With all the technological changes in bicycles these days, how do you decipher what’s what and how it will make you ride more fun? Let’s take a look at one of the fastest spreading innovations. This will be the first in a series of discussion on bike innovations and changes.
First off, I’d like to say I hesitate to call these changes “innovations” or “advancements”. The reason for this is, though many see them this way, many don’t see them this way and it can definitely make my job at the local level more difficult trying to explain the differences and nuances between the tried-and-true methods and the new. Nevertheless, let’s get to work.
We’re going to start this off with tubeless tire systems, the messiest and most confusing of these changes. Where to begin…
Tried and True method: Currently, most of you have something that would resemble the following: A wheel with rimstrip and a tire with a pneumatic tube inside. There are many renditions of this set-up but almost all bikes will come off of the showroom like this.
The Up-and-coming Tubeless: The basic setup of a tubeless tubeless system goes something like this: A wheel that has a specific bead (the part the tre seats into) design to hold the tire securely on the wheel and a tire that has another layer of rubber on the inside to hold air more efficiently. Inside the tire a sealant is installed. These sealants have different make-ups and applications but do essentially the same things. This sealant is NOT like the Slime that you see in a lot of big-box stores and at your local farm supplier. There are similarities but the performance is much better than Slime.
Pro’s: As a general rule, there is substantial weight savings. In most cases you are able to run lower tire pressure for a more comfortable ride with less risk of pinch-flatting your tire. The lower pressure also gives you more traction in the loose and squirrely stuff. Because you are running a sealant, small punctures that would normally end your epic ride tend to seal themselves and be less of an issue.
Con’s: Even with tubeless systems it is possible to pinch-flat if you are running your pressure too low. I’ve seen it. Also, if you get enough of a flat that your sealant can’t keep up you’ll need to put in a tube to get you home anyway. Tubeless sealant is also extremely messy and it kinda smells weird too.
The Applications: Purely from a basis of logic and experience tubeless systems will yield the most of the Pro’s and the least of the Con’s on larger volume tires. By this I mean basically anything but road tires. In the cyclocross, mountain, and fat categories you will be able to take advantage the lower pressures, lighter weight, and puncture resistance. But, since you have more air volume, you’ll be less likely to pinch-flat. With road systems, the weight savings is negligible and and you still have to run higher pressures to avoid the ever present danger of pinch-flats. You do however have a much more puncture resistant system than your standard tube and tire.
Of course I know this may very well cause more questions than it answers. That’s ok. If you’re interested (or just confused) stop in, we’d love to help.
Ben
Fall Classes Include Fresh BRAKE Goods
Ben’s Work Bench
Coming into fall is typically a reflective time for me. Where did I spend my energy during our crazy, busy season? Was I working in the best way that I could have? What do I need to improve? It’s a time to re-order my life, re-align my habits, and actively get better at what I do. Here at the shop I’ve continued to get some great feedback from all of you lovely people saying you’d like to see some more class offerings. Well, on top of “Tires & Tubes” and “Learnin’ and Lovin’ Your Bike” Northtowne is introducing “Fresh BRAKE Goods”.
As the name implies, this fresh class will be covering the ins and outs of brakes. All kinds of brakes. We’ll talk about most types of rim brakes as well as disc brakes and the pros and cons of each. We’ll go over the set-up and adjustment of the most common rim brakes and mechanical disc brakes. The only thing we won’t be covering in this class is the bleeding of hydraulic brakes. The reason for this? There are so many hydraulic systems out there with their own quirks that it needs to be a separate class…
Like the other classes, Fresh BRAKE Goods will be a mostly hands on class, so bring your bike to play with. If you actually need to replace any particular piece of your braking system, we have most of those parts in stock and I’m sure we could work something out - we’ll get you stoppin’. If you’re looking for a little more comprehensive class we have “Learnin’ and Lovin’ Your Bike” which is a primer on home maintenance and safety checks. We are also still offering “Tires & Tubes” which covers flat repair and common flat issues.
This year’s classes will kick off on October 22nd at 9:30am with “Learnin’ and Lovin’ Your Bike” followed by “Tires & Tubes” in a new weekday evening spot.
All of our classes will take registration through www.Eventbrite.com just search for “Northtowne”. We will be putting them up little by little as we get schedules finalized. Of course if you need anything before then, let us know. We’re here to help.
Ben
Flowers and Fix-Kits
Well! You’ve now participated in the fine sport of cycling! Congratulations! I’m sure the experience has been both daisies and dandelions, but, it’s possible you may have had some trail-side issues. When troubles arise where do you turn? Do you have a bike shop in your seat bag? Do you have a seat bag?
Trail-side repairs and tool needs can vary as widely as (and are sometimes dependent on) styles of riding. Here we will dwell mostly on the basic get-it-going-again kit that most everyone should have some version of. Keep in mind that each item I talk about herein comes in many styles and you should choose whatever suits your needs and style best. There are also many pre-packaged kits that you could choose from. All kits have strengths and weaknesses and can be a great start for someone new to riding.
Let’s start with the most common ailment to bike riders, the flat. To address a flat tire you will need minimally three items: Tire levers to remove the tire from the wheel, patches to patch the hole in the tube (or a new tube to swap out), and something to inflate the tube once you’ve got everything back together again.
Tire levers come in many shapes and sizes from the common plastic levers to the large steel or aluminum levers for the really tight applications. Ninety-nine percent of bike riders need nothing more than the standard plastic levers. They do a great job, but, do need to be replaced periodically as they can break with extended or improper usage. Don’t worry, they’re fairly inexpensive.
I’m going to lump patches and new tubes together for the sake of this conversation, the end result is essentially the same (you’re riding again). Anyway, there are two basic kinds of patch kits: Vulcanizing, in which you use sand paper to rough up the area and then glue the patch into place and hold it for a time to allow the glue to set. The second kind of patch is the self-adhesive. As the name implies, the glue is already in place on the patch. You still use sand paper to rough up the area but that is all the prep you need to do. Think of it as a glorified sticker… or a temporary tattoo. If you’re carrying a new tube all you have to do is find the cause of the flat, remove it, and install the new tube. I like to carry both a self-adhesive patch kit and a new tube in case I have multiple flats on one ride.
If your flat was caused by a large cut or hole in the tire, you’ll need to use a type of patch for that as well. These are commonly called “boots”. Boots are made from a very sturdy card-stock and coated with a plastic like water proofing. They are adhesive on one side so they can stick to the inside of the tire and stay in place while you put everything back together. I’ve also seen people fold up a dollar bill and effectively use it as a boot in a pinch. Note: Boots are intended for temporary use only. The tire should be replaced as soon as it’s convenient.
Now that everything is back together you’ll need air or all of this work you’ve done will be for naught. The two main styles of on-ride inflation are Co2 (compressed air in a can) and the traditional frame pump. Let’s discuss the frame pump first as it’s been around the longest. Frame pumps come in many shapes and sizes and mounting options. They all do a perfectly reliable job for what they are intended and you’ll never run out of air for your flats. However, if you’re in the habit of using it a lot, you may find yourself with a tired arm! Co2 inflation is nice and small and will get your tire pressure up in a jiffy. But, if you don’t have your Co2 canisters (or don’t bring enough) you will have no way to inflate when you have your next flat. Bummer. Also, each canister is a one-time-use deal and that means you’ll need to keep extras on hand. Recently a company came out with a hand pump that also is able to be used with Co2 canisters! Kinda the best of both worlds. You can use your Co2 to get going fast, but if you run out you still have a pump!
Aside from these essentials there are lots of tool possibilities that could come in handy on the trail. A good multi-tool can be very helpful for any small tweaks you may wish to make. If you are a mountain biking machine, you may want to bring a chain breaker and a new power link for you chain. If you are a touring enthusiast, you may want to bring a couple extra spokes and the proper sized spoke-wrench in case of trouble in the wilderness. There are other options too. Tell us what you’ll be doing and we can help you out.
Whatever supplies and tools you decide to take, you’ll need some way to carry them. There are dozens of options in the way of bags to attach to your bike and all of them can do a great job when used for the right reasons. My advice is to plan ahead. When you decide what goods you want to carry, ask yourself if you’ll want to bring anything else. Phone? Keys? Snack? Camera? Tent? I’ve never heard anyone say the bag they bought was too big for what they want to carry. I HAVE heard of people buying multiple bags because they underestimated what they’d want to bring on their epic adventures. Again, plan ahead, we’re here to help you be as prepared as you can be.
Ben
Recumbent/Trike Maintenance
Spring is once again in the air. With spring comes new things. New birds, new flowers, new smells, and of course, new bikes. Here at Northtowne, we’ve brought in an entirely new line of recumbent trikes! With new trikes comes new adventures and possibly new maintenance.
How different is maintenance for recumbents? Well, the regular stuff like lubing chains and pivot points and airing tires hasn’t changed. Recumbents are more likely to have non-traditional drive-trains. Instead of having an external derailleur and gears, a lot of recumbents are using internally geared hubs. This is nice as they are less likely to get damaged from impact. However, most require periodic maintenance to run at their best at all times.
Whereas on an external derailleur system it’s minor adjustments and making sure the hub is adjusted properly, it’s not uncommon to overhaul an internally geared hub once a year (depending on mileage). This is an operation that should be done by us as it uses fairly specialized tools and supplies and is worth the nominal fee to keep your steed running in the top of the brackets. Other, fancier internal systems are essentially maintenance free aside from some shift-cable adjustments now and again.
On all bicycles whether traditional or recumbent it is important to be sure your tires are inflated properly and you chain is lubed (I’ve written other articles on these). Every time you go for a ride you should check your brakes, pedals and the pinch bolts on your handle bars to ensure you’ll be safe. After all, safety is just as important as fun when you’re on your bike. Enjoy your adventure and if you have any questions let us know. We’re here to help.
Ben
Preparing for Your Trail Rides
Monday, August 24th Matthew Byers left on his newest adventure. Matt is riding his mountain bike from Cedar Rapids to Virginia Beach, Virginia to raise awareness for the Cedar Rapids Boys and Girls Club. Now, maybe your next ride won’t take you a month to complete. That takes a lot of preparation. But, there are things you should do to prepare for most rides.
The first item to check may seem obvious at first: Tires. As I’ve mentioned in a previous post, improper tire pressure can lead to a slew of problems and frustrations during your ride. So check your pressure. All modern (and most “classic”) tires have recommended pressure ranges on the sidewall. They may be hard to see but they are there. While you are topping off the pressure inspect the overall condition of the tire. How does the tread look? If it has a square profile or there are threads showing then you may need to replace it. Are there any nicks or cuts in the tire that could come back to bite you in the middle of your twenty miler? Who likes getting stranded? To put it dramatically, poor tire condition can kill your ride. Wear a helmet and act accordingly.
Another item to check is call a Quick Release Lever or “QR”. There are two important QRs on a bicycle. One that holds the front axle in place and on that hold the rear axle in place. The rear QR is rarely an issue since the rear wheel is rarely taken out of the bicycle frame. It’s worth a check, but we’re mostly concerned with the front. All QR levers have words printed on them. Typically they will have a brand name on them. They always (by law) have the words “Open” and “Close” or “Closed” on them somewhere. This is important! When you ride your bike you should be able to read “Close” or “Closed” on the lever and the wheel should be tight in the frame/fork. You should not be able to read “Open”! At best when you can read “Open” the wheel is tight in the frame and just a pain to get out. Or the wheel is loose in the frame and could come loose while riding rubbing on everything and just be irritating in general. At worst, the wheel becomes loose enough in the frame and falls out causing lots of pain and/or embarrassment. Wear a helmet.
More safety to consider. At the end of all handle bars is a small plastic or metal plug. Make sure they are there. While it is possible to get hurt by wrecking and landing on a bar that has plugs in them, the likelihood goes through the roof if there are no plugs in the end of the bars. This is especially important for kids as they tend to push the limits and wreck more frequently. Bar end plugs are fairly inexpensive even if you get the fancy ones. So, please, make sure you and your kids have these. And wear a helmet
Once you’ve been riding for a while it’s likely you’ll need to stop. So, before you roll out of your drive-way for good, please do a brake check. Most importantly make sure you can stop. A metallic rubbing sound can be common when you use your brakes, but if you hear something like that make sure you still have rubber on your brake pads. It’s normal to have small splinters of metal from your braking surface in your pads. If you see a piece of metal that spans most of the length of the pad, then you may have worn through the pad and into the support metal behind – you need new pads at this point. If your pads have seen a few decades, the pad rubber has probably become hard and will not stop well - you need new pads at this point. Of course, if you can’t stop you may wreck. Wear a helmet.
If you are planning on riding within a half hour of sunrise or sunset you are required to have some sort of headlight and taillight. You can actually get a ticket for this (it’s happened). While that may sound ridiculous, it’s the law and should be observed. There have been many times I’ve come close to hitting someone because they are dressed in all black, at night, with no lights or reflectors. It’s a safety thing, so make sure your lights are in working order. They may help save your life someday. If you do get hit make sure you are wearing a helmet.
Riding a bike is a relatively safe endeavor. It’s also healthy and a blast to do! That being said, weird things can happen, it’s best to be prepared. Helmets can save lives and livelihoods. According to the Insurance Institute for Highway Safety: “Helmet use has been estimated to reduce the odds of head injury by 50 percent, and the odds of head, face, or neck injury by 33 percent.”* Helmets work, just check this article out: http://www.active.com/cycling/articles/bike-helmet-crushed-but-head-fine
Be safe, ride hard, have fun. If you have questions come on in. We’re here to help
Learnin' & Lovin' Your Bike
Bens Work Bench
Another summer season has passed and here we are, waiting for snow. Just a few weeks away from Christmas and a long (hopefully) break from work or school. I hope you and your fat bike are ready! What? You don’t have a fat bike?! You should remedy that! We can help! We have seven brands of fat bikes in stock now and more on their way! Of course, if you are truly set on barricading yourself in doors, there are other options.
You could spend your winter planning next years trip. http://bicycletouringpro.com/blog/50-places-to-bike-before-you-die/
You could expand your culinary horizons. http://www.bikepacking.com/plog/bikepacking-meal-planning-foodpacking-1/
Or, you could curl up with a nice book. http://www.theguardian.com/books/2010/oct/14/top-10-cycling-novels
Really, with the length of winters around these parts, you could do all three. Since I am such a fan of learning, however, may I suggest a fourth? Learn some basics about your bike and how to maintain it.
Often, we as riders know how to ride and that is where it ends. Minimally we should know how to remove, inspect and change a tire or tube. Well, here’s your chance! We are offering a few more Tires and Tubes Classes here at Northtowne this winter taught by myself. Please follow the links to register:
December 12th https://www.eventbrite.com/e/tires-tubes-women-only-tickets-19475025325?aff=ebrowse
January 23rd https://www.eventbrite.com/e/tires-and-tubes-tickets-19390614851?aff=ebrowse
February 13th https://www.eventbrite.com/e/tires-and-tubes-tickets-19390615854?aff=ebrowse
Based on questions we have gotten from new riders over the years we have developed a class new to Northtowne: Learnin’ and Lovin’ Your Bike. This class is designed to answer the questions many riders don’t know how to answer or even that they need to be asked. We will be covering the anatomy of a bicycle and how and what to check for safety before rides. We will get some practice on basic maintenance including how to properly lube a chain, checking tightness of bolts and pedals and tire pressure. As well as basic adjustments you can do with minimal tools in the comfort of your own home or garage. Here are the links to register:
January 9th https://www.eventbrite.com/e/learnin-and-lovin-your-bike-tickets-19535709834?aff=ebrowse
February 20th https://www.eventbrite.com/e/learnin-and-lovin-your-bike-tickets-19535710837?aff=ebrowse
All of the classes are limited in size so things don’t get out of hand and so you get the best experience with all your questions answered. I hope to see you there. In the meantime, if you have any questions (Or need a fat bike) let us know, we’re here to help.
Ben
It's Spring!
It’s Spring! You know what that means: Pull your bike out of the garage where it was lovingly tucked it in for the winter under a cozy storage cover with a good coat of chain lube. Now what? Well, if you haven’t had a full service on your bike for a while this would be a great time to bring it in to the Pros. If all looks good, then you will definitely need to inflate your tires.
Not having proper tire inflation makes you more susceptible to pinch flats or “snake bites”. This happens when you hit a bump, curb or pot-hole and there is not enough pressure to keep the rim from hitting said obstacle. The rim will cut through the tube (usually twice) and sometimes even through the tire itself.
Another result of under inflation is premature tire wear. When your tire is ridden on low, the side wall of the tire will be continually crumpling as you ride down the street. This causes the rubber to wear off and exposes the tube eventually causing a blow-out. Low pressure also causes a sluggish feeling while riding and just isn’t as much fun! So, please air your tires.
All tires have an inflation recommendation on the side. The PSI (Pounds per Square Inch) rating may be hard to see so don’t feel bad if you need to get a flash light for a little help. There will be two numbers, a minimum PSI and a maximum PSI. Where your specific tire pressure falls between the two is based on a few things.
The first thing to consider is where do you ride? If you ride mostly on a hard surface (streets or multi use trails) then you would try running them closer the higher PSI. If you ride on softer surfaces such as single track or gravel roads then you could try something closer to the minimum.
The second consideration is the riders weight. This is not the most popular topic in the bicycling world but it does matter when it comes to tire pressure. The larger a person is the more force they exert on the tire, tube and any obstacles they run into. So it stands to reason that a larger person would have a tire inflated closer the max PSI and a smaller person closer the minimum. This consideration ties into the third which is comfort.
Comfort is based solely on personal preference. Running a pressure that is too high for your weight or riding conditions will make the bike feel rough. A rough feeling bike will make you slow down because you won’t feel as stable as you should. If you take you pressure from 110 PSI to 100 PSI you may be surprised how much more stable you feel. There will be less stress on your body as well. Your hands will be more comfortable longer and your shoulders, back and neck will also. As I said earlier, Low pressure will feel slow and sluggish and just not be as much fun.
Based on the above guidelines and some time on your bike you can play with air pressures and find out what makes you comfortable while serving your purpose on which ever trail you choose. Of course the most important thing is to get onto your bike and have fun being healthy. See the city, see the world and if you ever have a question bring your bike to us. We’re here to help.
Ben
Squeaky Wheel Gets the G(r)eese
Squeaky Wheel Gets the Geese
Riding down the trail on any given day you’ll see fish and ducks, get chased by the occasional goose or blackbird and hear birds all around. I love nature. It’s one of the reasons I enjoy riding so much. What I don’t appreciate is the sound of my drive train imitating the birds around me as well as annoying the other riders I’m with.
So what do you do about that noise? You could yell at it. Or put it in time out like a small child that won’t behave. I prefer chain lube. This little beauty of a product comes in many forms for different types and conditions of riding and will silence the squeaking of your drive train. But there are SO MANY. How do you choose? How do you use them?
There are basically two types of lube for bike chains: Wet and Dry. Within these two categories are many formulas and brands that each tout themselves as the best. For the average rider however, the effectiveness of the lube is more dependent on proper usage than formula or brand. We’ll get to that later.
Wet lube stays wet to the touch when on the chain and is intended for wetter conditions. If you are riding in the Pacific Northwest this would be a good choice in lube. Wet Lube also works well for winter riding. The properties of the lube which keeps it wet to the touch on the chain also keep it from freezing except extreme conditions.
Dry lube goes onto the chain wet and dries within a few minutes. Once dry the lube is less likely than wet lube to attract dirt and dust which can cause premature wear on a drive train. Dry lube is a good choice for almost all conditions expect for extremely rainy areas. As I said, no matter which lube you choose, the application is the key to keeping the squeaking away.
To apply chain lube, put the bike in a repair stand or turn it upside down so you don’t have to worry about the bike falling on you. Get a rag. Dirty or clean, it doesn’t matter. Hold the rag around the chain somewhere between the crankset and derailleur. Turn the pedals backward about five times. This will knock off some of the existing gunk cleaning it for the reapplication. If your drive train is really dirty or has a lot of lube/grime build up there are other products you can get to help you clean it or bring it to us and we’d love to do a drive train clean for you. Once you’ve wiped the chain off to your satisfaction, hold your bottle of lube up to the top (or bottom if the bike is upside down) of the chain and apply while pedaling backward about five times. Five rotations of the crank should be enough to lube the entire chain. After applying the lube let it set on the chain for about five minutes or according to the instructions on the lube you are using. Once the lube is set get your old rag and wipe the excess lube off of the side of the chain only.
Now you’re ready to roll sweetly and quietly down the trail enjoying the sounds of nature and not the jeers of your friends. Lubing your chain is something you should be doing every two to four weeks or if you get caught in the rain or ride in the snow. Under these circumstances you should be re-lubing as soon as you get home. As always if you have questions, come talk to us. We love educating you!